This post is an up-to-date version of the repartitioning guide from sumodou.org.
Wednesday, 30 December 2009
Friday, 13 November 2009
Ubuntu 9.10 Karmic Koala: Games submenus and stylish notification icons
Blogging has not held my interest recently, but tonight I thought I should jot down some things about Ubuntu 9.10, the Karmic Koala.
The new release is shinier and fancier than before, and contains genuine improvements, such as the ibus input method (Chinese works out of the box in all programs!), the Bluetooth manager (almost as good as Blueman), and the new, more informative grayscale notification icons.
The new release is shinier and fancier than before, and contains genuine improvements, such as the ibus input method (Chinese works out of the box in all programs!), the Bluetooth manager (almost as good as Blueman), and the new, more informative grayscale notification icons.
Friday, 29 May 2009
verminds-alarm-clock 0.5.4.4
verminds-alarm-clock is now at version 0.5.4.4.
Changes include removal of the save button, since the program now saves settings on exit. Also, all actions on the user interface cause the alarm thread to refresh, meaning that your changes now reliably take effect instantly.
Get the new version here:
Changes include removal of the save button, since the program now saves settings on exit. Also, all actions on the user interface cause the alarm thread to refresh, meaning that your changes now reliably take effect instantly.
Get the new version here:
Monday, 18 May 2009
PyGTK - the easy way
Someone with a bit of free time made an installer that has everything needed to run PyGTK on windows. So, now people interested in an alarm clock that uses a media player for playing the alarms, can just download and install this, and then unzip and double-click my alarm clock. This 2-step process replaces the previously mentioned 6-step process.
Edit: It would seem that the installer cannot be downloaded any more. Therefore, I looked for and found another one. Enjoy.
Edit: It would seem that the installer cannot be downloaded any more. Therefore, I looked for and found another one. Enjoy.
Thursday, 14 May 2009
Verminds Alarm Clock 0.5.4.2
Changelog:
0.5.4.2
Links to packages:
See previous posts for installation instructions.
0.5.4.2
- Background the player process
Links to packages:
See previous posts for installation instructions.
Wednesday, 13 May 2009
Verminds Alarm Clock 0.5.4.1
The alarm clock is now version 0.5.4.1. Changes:
Installation instructions:
Works on Windows, requires the .svg icon in the same folder as the .py. Further requirements:
- Fixed song selection file chooser associating with player selection
- Playing the alarm now hangs the alarm clock, until the player command returns. This is because I use the subprocess package for launching the player, this was the only way to get filenames with spaces in them to behave correctly on Windows. To be fixed.
Installation instructions:
- Linux: double-click on the .deb, follow instructions. The alarm clock can be started from the Accessories submenu. The console command verminds-alarm-clock.py also does the job.
- Windows: Install the requirements mentioned above. Then extract the .zip and double-click verminds-alarm-clock.py to run.
Thursday, 7 May 2009
Verminds Alarm Clock
Verminds Alarm Clock is now version 0.5.2.1. The new version is compatible with GNOME systems with or without python-indicate. This means it works on both Ubuntu Jaunty and earlier Ubuntu systems. It requires the installation of Python GNOME libraries, i.e., the python-gtk2 package. The deb will request that to be installed when you click on it. Get it here.
Tuesday, 5 May 2009
Perfect Ubuntu Setup - Instructions - 2
This is the second post in the series Perfect Ubuntu Setup - Instructions. This post details setting up Firefox; experimental or the default version, with all plugins necessary to handle the content on the web. We will also remove clutter, such as unused elements, on the user interface. Hint: All the tips that deal with Firefox add-ons and extensions also work in the Windows version of Firefox. Try them!
Vertical Space
Vertical Space
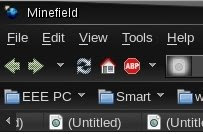
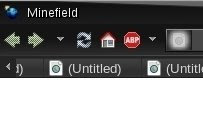
To see how to Firefox can be made to use less vertical space, compare these two pictures:
When we remove the menu bar and bookmark bar, we reduce the vertical size taken up by the top part of Firefox to about half. This is more space for websites when You are browsing in a window, or in a maximized window with controls visible. Hint: You can also fullscreen firefox by pressing F11. This hides the bars to the top of the screen, you can show them again by moving the mouse to the top. Press F11 again to return to a window. Firefox allows you to search through your bookmarks by just typing words in the address bar, so bookmark folders and menu options are not usually necessary. There is also a small bookmark button you can put on the navigation bar. It allows accessing your bookmarks without adding extra permanent bars on your Firefox. To make these modifications, install the Firefox Personal Menu add-on. Then right-click near the address bar, and untick the Bookmarks Toolbar. You can also select Customize... to add or remove elements from the bars that you want to keep.
Ads were yesterday
Firefox's success as a web browser was originally sparked by its rendering speed and liberal license, compared to many competitors. Nowadays Firefox has become a slower monster. However, the latest development releases boast some speed improvements. However, a lot of people, including myself, use Firefox because of its extensibility. That the competitors are not essentially better, or available on my favourite platform, is another reason.
The Firefox extension called Adblock plus also available for some other browsers, is a big reason to use Firefox. Adblock plus, to put it simply, prevents Your browser from downloading unwanted advertisements. What is unwanted is determined by You. You can also subscribe to advertisement filter lists, which auto-block a large part of the advertisements online. With Adblock plus, You reclaim the web from advertisers, and see and download only what You want to. You can install Adblock plus from the page linked to in the beginning of this paragraph. After installation, restart Firefox, and configure your ad filters. You can get rid of ads that You do not like by right-clicking them and choosing Adblock item/image. Some flash videos, which do not allow a middle click, Adblock fixes by adding a small "Adblock" tag in their top corner. Clicking that gives you options on blocking the item.
Security with NoScript
A lot of web-browser exploits take advantage of the fact that any program code, or scripts embedded in a web page are run by Your web browser on entering a website. Poorly protected websites might use text provided to a webpage to generate content on the next page, without checking the text for malicious code. This allows what is known as a Cross Site Scripting (XSS) attack, where an attacker tricks a website into downloading a piece of malicious code, and the resulting malicious version of the web page is shown to the user. If the malicious code is for example a silent program that sends your keyboard strokes to a listener program, and the site is Your bank site, You can imagine what can happen. The Firefox NoScript add-on disables all scripts on all websites by default, and forces you to explicitly allow newly visited sites into a list of allowed scripting. It prevents XSS by default, simply by checking the address of scripts against the address of the current website. It also includes an unsafe mode where all scripting is allowed, which may for example be used to see if a non-functioning site was crippled by NoScript itself, for some reason.
Security and Perspectives
All sites that implement secure login use SSL these days. This means they use a certificate, issued by an authority that your web browser, or You, trust. These authorities do not give the certificates freely, but require fifty or more euros per year of certificate validity. This is why a lot of sites employ a self-signed certificate, which in effect says just that the site is certified by its author (and its author is not certified by anyone). While both officially certified and self-signed sites can be attacked with a man-in-the-middle attack, by a person showing you a non-secured, but secure-looking site, that is almost an exact replica of your bank site, social networking site, etc, there is one small difference: The attacker has not broken the original protection, he is just trying to trick you into not using it. The Firefox Perspectives add-on employs a bunch of computers storing a certificate history for a lot of websites. When You make a secure connection, Perspectives checks that the certificate has not been modified; that it is signed with a valid key. This helps in two ways:
1. You know that the site has not been tampered with
2. You don't get annoying warnings from sites signed with self-signed certificates, because perspectives remembers them.
The Perspectives add-on was developed by researches at the Carnegie Mellon University, and the download site also has a link to a white paper about it, if you are interested in its function.
Download Statusbar
If the separate download window ever annoyed You, this add-on is for You. The Download Statusbar Firefox add-on puts Your file downloads to the status bar, on the bottom of the Firefox window. No need to open a new window to see the downloads, they are shown in Your currently focused Firefox window.
Ubuntu Tweak
This should probably be in its own post, but I put it here for now. Ubuntu Tweak is a tool to automate adding the custom repositories and sofware to Ubuntu that make it surpass most Windows installations in Internet multimedia playing capabilities. Most of Windows users cannot play embedded MPEG or other movies/sounds on web sites, if they are a non-windows format. After Ubuntu Tweak, you will be able to play anything that Mplayer, Java and Adobe Flash can handle. With Wine and MozControl, you may be able to handle ActiveX / Windows only websites.
To start on the easy path to tweaking Ubuntu, download Ubuntu Tweak. Install it by double-clicking on the downloaded .deb. Then fire it up from Applications - System Tools - Ubuntu Tweak. Inside, you can click Applications to show a lot of extra applications to install. For playing all kinds of media such as movie files and dvds, click Third Party Sources, then Unlock (this may require your password) and Medibuntu, the last entry in the list. then click Refresh and click Add/Remove after the process is finished. Now, in Add/Remove, You should tick Ubuntu Restricted Extras for non-default media playing stuff, and Wine Microsoft Windows Compatibility Layer for Wine, the program that installs and runs Windows software (at least some of it). After clicking Apply, you should have flash video support with Flash 10 from Adobe, and be able to e.g., play Youtube videos. Java may not yet work at this point, so the Java test page may fail. If it does, we can set up Java by starting Synaptic from the System - Administration menu, and install the package called sun-java6-plugin. Then restart Firefox, and You should have Java. If You experience Java difficulties, try removing icedtea6-plugin with Synaptic. To finish up with Firefox media playing, install mozilla-mplayer from Synaptic, and restart Firefox. Here you can check the media player functionality.
Perfect Ubuntu Setup - Instructions
Hello,

in this post series, I will explain, step by step, how to customize Ubuntu 9.04 to, at least, my liking. I will show how to conserve vertical screen space, how to change the default colour scheme, how to clean up Firefox, how to easily install commonly used software, including Windows software, and how to make the most of the Gnome Panel. I will also introduce a program that lets You juice up that kludgy laptop pad mouse. The first post will deal with changing the look of Ubuntu to suit Your preferences.
The picture to the left shows some examples of Ubuntu themes. The same themes can be applied on any Linux system that uses the GNOME desktop.
![]() As You might have guessed, this guide requires Ubuntu. Most of the things here do not require a very new version. I recommend Ubuntu 8.04 or newer. If You already have a previous Ubuntu version, You can fire up the Update Manager from System - Administration - Update Manager. It allows you to Upgrade the system to the new version. For those who do not have Ubuntu, the first step is to download and burn an Ubuntu LiveCD. This CD allows You to try Ubuntu and these instructions without touching your hard disk. It also has an easy to use installer, should You choose to install it. To get Ubuntu, go to the ubuntu download site. Choose a location, and click Begin download. This may take some time. After You have downloaded the CD image, use your favourite CD burning software to make a bootable CD out of it, or use some tool such as UNetbootin for making a bootable USB memory stick instead. Then boot with it, and start tweaking!
As You might have guessed, this guide requires Ubuntu. Most of the things here do not require a very new version. I recommend Ubuntu 8.04 or newer. If You already have a previous Ubuntu version, You can fire up the Update Manager from System - Administration - Update Manager. It allows you to Upgrade the system to the new version. For those who do not have Ubuntu, the first step is to download and burn an Ubuntu LiveCD. This CD allows You to try Ubuntu and these instructions without touching your hard disk. It also has an easy to use installer, should You choose to install it. To get Ubuntu, go to the ubuntu download site. Choose a location, and click Begin download. This may take some time. After You have downloaded the CD image, use your favourite CD burning software to make a bootable CD out of it, or use some tool such as UNetbootin for making a bootable USB memory stick instead. Then boot with it, and start tweaking!
Themes, Firefox and OpenOffice

- Some appearance themes
When I set up a new Ubuntu machine, the first thing that bugs me are the interface colours. I include here some of my favourite themes, from old to new. I currenly use the pleasant dark-coloured Murrine Wise Dark, found in the Murrine Colors theme package. To install it, download the package, go to System - Preferences - Appearance and click the Install option. Then point the file browser at the downloaded package and press Ok. The Murrine Colors themes specify an icon set preference to use with them. If You do not have the icon set installed, or prefer another, You can simply change the icon set from Customize - Icons. I use the Tango icon set. I recently used the black Slickness-black theme with white text, easy on the eyes, and SlicknesS for Openoffice: slickness-dark-theme.tar.gz. Previously, I used the pleasantly green combination of the Cillop-Mediterranean and Gilouche themes, with black text: cillopgreen-theme.tar.gz. Users of white text themes know that setting up a web browser to fix all the erroneous web pages with backgrounds set to white, and text colour unset, or text colour set to black, and backgrounds unset, can be a pain. I also include a firefox_userContent.css Firefox colour override file for input fields and boxes, for this purpose. In the old days when I used gentoo, my preference was minimal decorations around windows, and maximum space available for applications. The chaos-gtk theme, ripped off from the chaos fluxbox/blackbox theme, is such: chaos-all-theme.tar.gz. To install the themes, You double click them, and extract to the home directory. Hint: Your home directory is on the left side of the file browser window that appears after you click extract. It is named after your username. Installed themes appear in System - Preferences - Appearance. You can activate them by clicking on them. To install the firefox content override, You go to your firefox profile folder. To find it, go to your home folder, and press Ctrl-H (Show hidden files). Then double-click .mozilla. Hint: You can start typing the name of a file or folder when browsing. This brings you to that folder quickly. You can then press enter to activate it. Then double-click firefox, and finally the profile name, which is something like mfeoifngee.default. In there you will see a folder called chrome. Put the userContent.css file in that folder. Make sure it is called userContent.css (Yes, the uppercase C is required). The firefox content override activates when put in the folder, when firefox is next restarted. To remove it, you need to rename or remove the file that we just saved in the profile folder. The override makes all input boxes black, and their text white, as the picture below shows.

- Firefox dark input boxes
Some of my themes require extra theme engines, icon themes, and mouse cursor themes to be installed. The chaos themes require the pixbuf gtk2 engine, the slickness themes require the ubuntulooks engine, and the Murrine themes require, surprise, the Murrine theme engine. I recommend the oxygen mouse pointer suite; it has a wide variety of colours and stylish, well animated pointers. Regardless of theme, I also recommend the Tango icon set. Tango icons have a standard set of colours, and clear rules on what icons should look like. Their expressiveness and simplicity appeal to the eye.
To install these things, go to System - Administration - Synaptic Package Manager. It will ask you to input your password. The password will be remembered for the next 5 minutes, if you do other administration. The theme engines are found by the names gtk2-engines-pixbuf, gtk2-engines-murrine and gtk2-engines-ubuntulooks. Hint: You can click the right part of the window, where the package names are, and start typing a package name to find it quickly. If you know the program or type of sofware you want, but do not know the package name, you can use the search button at the top part of the window. The mouse pointer suite is called oxygen-cursor-theme, and the extra colours oxygen-cursor-theme-extra. The tango icon set is called tango-icon-theme. I also installed tango-icon-theme-extras. To install something, double-click it, or right-click and mark for installation. Some programs may require additional changes when marked; for example, the ubuntulooks gtk2 theme requires you to remove the Ubuntu default window decorations package, human-theme. Removing this is not too drastic, but if you ever try to install or uninstall something that would require you to remove dozens of packages, it is likely dangerous and will render Your system unusable. Luckily, nothing will be installed until you click the big green Apply button in the top part of the window. Always take care to review your choices before clicking apply. To do this, look on the bottom left of the window. Click Custom filters. Now you have several new filters visible on the top left of the window. Click Marked Changes to review the changes you have marked. If something looks wrong, You can always right-click it and choose unmark, or close the program altogether, without applying the changes. After you click apply, the system will download the new packages, and install, remove and upgrade the packages that you requested.
OpenOffice High Contrast misfeature


The most widely used, and Ubuntu recommended free office suite, called OpenOffice or OpenOffice.org, thinks that you want to lose all colours when your colour scheme has a white foreground and a dark background colour, as demonstrated by the first picture. This makes presentations look wrong, text documents lose colour markup, spreadsheets lose most printing options, and so on. To turn this horrible misfeature off, when you have a dark theme, you need to tell openoffice to use a lighter theme instead. Luckily, the SlicknesS GTK2 theme matches the SlicknesS-black in looks, but is light enough for OpenOffice. Use this fix only if you use the SlicknesS-black dark theme. It is not required on normal themes, nor is it required with Murrine Colors. There are two steps to the process of activating this fix:
- Making sure that updates do not remove the fix, and
- Adding one line in the OpenOffice startup script.
For me, the best way to ensure things are done correctly and to the letter according to instructions, is using command line programs to do things. This is also usually faster. To open the command line in Ubuntu, go to Applications - Accessories - Terminal. Then run these commands to fix OpenOffice colours:
cd /usr/lib/openoffice/program # go to OpenOffice directory
sudo dpkg-divert --rename --add $PWD/soffice # Divert openoffice startup script updates away from the modified file

awk 'BEGIN{ s=0 }
$0 == "" && s == 0{
   print "export GTK2_RC_FILES=\"/usr/share/themes/DarkRoom/gtk-2.0/gtkrc\"";
   s=1;
   next;
}
{ print $0; }' soffice.distrib | sudo tee soffice # this will create the soffice copy with the GTK2_RC override line.
sudo chmod 755 soffice # make the copy executable for all
And we are done with the fix. Now, You can start OpenOffice with
openoffice.org
or select it from Applications - Office - OpenOffice.org Word Processor. The white - and - black look should be gone, but You should now have good icons and colours visible on documents. In The Openoffice Tools - Options menu You can fine-tune Appearance to Your liking.
This concludes the instructions for changing the look of Ubuntu. The rest of the customizations will follow in future posts; the next post will discuss making Firefox sleek, quick and powerful.
My Alarm Clock
This post announces the publication of my Alarm Clock written in PyGTK, for Ubuntu 9.04. It integrates with the new Indicator Applet, requiring no tray icon, unlike the previous version. Get it here.
Automatic Tag Cloud
I just added an automatic tag cloud widget. Let's see how well it matches my posts..
Subscribe to:
Posts (Atom)
